属性赋值可以用@Value和@PropertySource注解来实现…
[TOC]
@Value
Spring中的@Value注解可以为bean中的属性赋值。我们先来看看@Value注解的源码,如下所示。

从@Value注解的源码中我们可以看出,@Value注解可以标注在字段、方法、参数以及注解上,而且在程序运行期间生效。
@Value注解的用法
不通过配置文件注入属性的情况
通过@Value注解将外部的值动态注入到bean的属性中,一般有如下这几种情况:
注入普通字符串
1
2
| @Value("lisi")
private String name;
|
注入操作系统属性
1
2
| @Value("#{systemProperties['os.name']}")
private String systemPropertiesName;
|
注入SpEL表达式结果
1
2
| @Value("#{ T(java.lang.Math).random() * 100.0 }")
private double randomNumber;
|
注入其他bean中属性的值
1
2
| @Value("#{person.name}")
private String username;
|
注入文件资源
1
2
| @Value("classpath:/config.properties")
private Resource resourceFile;
|
注入URL资源
1
2
| @Value("http://www.baidu.com")
private Resource url;
|
通过配置文件注入属性的情况
首先,我们可以在项目的src/main/resources目录下新建一个属性文件,例如person.properties,其内容如下:
person.nickName=zsxfa
然后,我们新建一个MainConfigOfPropertyValues配置类,并在该类上使用@PropertySource注解读取外部配置文件中的key/value并保存到运行的环境变量中。
1
2
3
4
5
6
7
8
| @PropertySource(value={"classpath:/person.properties"})
@Configuration
public class MainConfigOfPropertyValues {
@Bean
public Person person() {
return new Person();
}
}
|
加载完外部的配置文件以后,接着我们就可以使用${key}取出配置文件中key所对应的值,并将其注入到bean的属性中了。
1
2
3
4
5
6
7
8
9
10
11
12
13
14
| @Data
@NoArgsConstructor
@AllArgsConstructor
@Scope
public class Person {
@Value("Jachin")
private String name;
@Value("#{20-2}")
private Integer age;
@Value("${person.nickName}")
private String nickName;
}
|
@Value中#{···}和${···}的区别
我们在这里提供一个测试属性文件,例如advance_value_inject.properties,大致的内容如下所示。
1
2
| server.name=server1,server2,server3
author.name=liayun
|
然后,新建一个AdvanceValueInject类,并在该类上使用@PropertySource注解读取外部属性文件中的key/value并保存到运行的环境变量中,即加载外部的advance_value_inject.properties属性文件。
1
2
3
4
5
6
7
| @Component
@PropertySource(value={"classpath:/advance_value_inject.properties"})
public class AdvanceValueInject {
}
|
以上准备工作做好之后,下面我们就来看看${···}的用法。
${···}的用法
{}里面的内容必须符合SpEL表达式,通过@Value(“${spelDefault.value}”)我们可以获取属性文件中对应的值,但是如果属性文件中没有这个属性,那么就会报错。不过,我们可以通过赋予默认值来解决这个问题,如下所示。
1
2
| @Value("${author.name:zsxfa}")
private String name;
|
上述代码的含义是表示向bean的属性中注入属性文件中的author.name属性所对应的值,如果属性文件中没有author.name这个属性,那么便向bean的属性中注入默认值zsxfa。
#{···}的用法
{}里面的内容同样也是必须符合SpEL表达式。例如
1
2
3
4
5
6
7
|
@Value("#{'Hello World'.concat('!')}")
private String helloWorld;
@Value("#{'Hello World'.bytes.length}")
private String helloWorldBytes;
|
${···}和#{···}的混合使用
${···}和#{···}可以混合使用,例如
1
2
3
|
@Value("#{'${server.name}'.split(',')}")
private List<String> severs;
|
上面片段的代码的执行顺序:通过${server.name}从属性文件中获取值并进行替换,然后就变成了执行SpEL表达式{'server1,server2,server3'.split(',')}。
在上文中#{}在外面,${}在里面可以执行成功,那么反过来是否可以呢?也就是说能否让${}在外面,#{}在里面,就像下面这样呢?
1
2
3
|
@Value("${#{'HelloWorld'.concat('_')}}")
private List<String> severs2;
|
答案是不能。因为Spring执行${}的时机要早于#{},当Spring执行外层的${}时,内部的#{}为空,所以会执行失败!
小结
#{···}:用于执行SpEl表达式,并将内容赋值给属性${···}:主要用于加载外部属性文件中的值${···}和#{···}可以混合使用,但是必须#{}在外面,${}在里面
@PropertySource加载配置文件
@PropertySource注解概述
@PropertySource注解是Spring 3.1开始引入的配置类注解。通过@PropertySource注解可以将properties配置文件中的key/value存储到Spring的Environment中,Environment接口提供了方法去读取配置文件中的值,参数是properties配置文件中定义的key值。当然了,也可以使用@Value注解用${}占位符为bean的属性注入值。
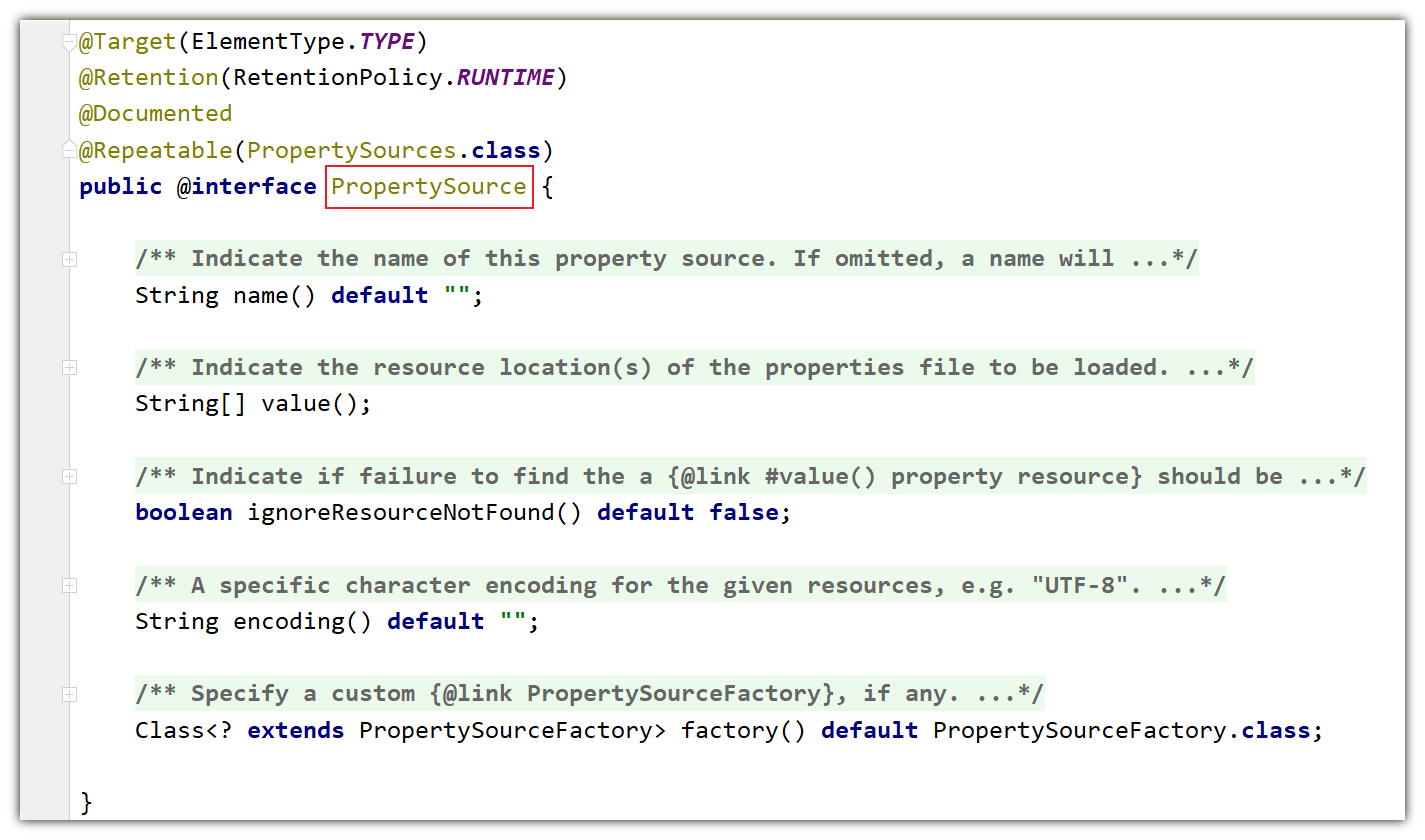
我们来看一下@PropertySource注解的源代码,如下所示

从@PropertySource的源码中可以看出,我们可以通过@PropertySource注解指定多个properties文件,使用的形式如下所示。
1
| @PropertySource(value={"classpath:/person.properties", "classpath:/car.properties"})
|
细心的读者可以看到,在@PropertySource注解的上面标注了如下的注解信息。
1
| @Repeatable(PropertySources.class)
|
@PropertySources注解概述
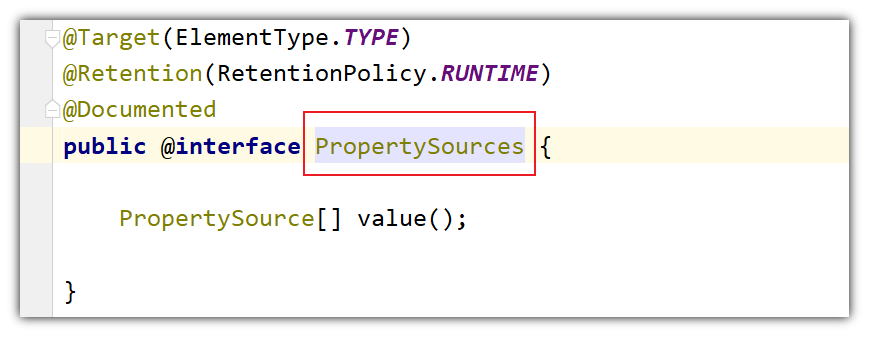
首先,我们也来看下@PropertySources注解的源码,如下所示。

@PropertySources注解的源码比较简单,只有一个PropertySource[]数组类型的value属性,那我们如何使用@PropertySources注解指定配置文件呢?其实也很简单,使用如下所示的方式就可以了。
1
2
3
4
| @PropertySources(value={
@PropertySource(value={"classpath:/person.properties"}),
@PropertySource(value={"classpath:/car.properties"}),
})
|
@PropertySource注解案例
首先,我们在工程的src/main/resources目录下创建一个配置文件,例如person.properties,该文件的内容如下所示。
然后,我们在Person类中新增一个nickName字段,如下所示
1
2
3
4
5
6
7
8
9
10
11
12
13
| @Data
@NoArgsConstructor
@AllArgsConstructor
@Scope
public class Person {
@Value("Jachin")
private String name;
@Value("#{20-2}")
private Integer age;
private String nickName;
}
|
使用XML配置文件方式获取值
如果我们需要在XML配置文件中获取person.properties文件中的值,那么我们首先需要在Spring的XML配置文件中引入context名称空间,并且使用context命名空间导入person.properties文件,之后在bean的属性字段中使用如下方式将person.properties文件中的值注入到Person类的nickName字段上。
1
2
3
4
5
6
7
8
9
| <context:property-placeholder location="classpath:person.properties" />
<!-- 注册组件 -->
<bean id="person" class="com.zsxfa.bean.Person">
<property name="age" value="18"></property>
<property name="name" value="liayun"></property>
<property name="nickName" value="${person.nickName}"></property>
</bean>
|
此时,整个beans.xml文件的内容如下所示。
1
2
3
4
5
6
7
8
9
10
11
12
13
14
15
16
17
18
19
20
| <?xml version="1.0" encoding="UTF-8"?>
<beans xmlns="http://www.springframework.org/schema/beans"
xmlns:context="http://www.springframework.org/schema/context" xmlns:p="http://www.springframework.org/schema/p"
xmlns:aop="http://www.springframework.org/schema/aop" xmlns:tx="http://www.springframework.org/schema/tx"
xmlns:xsi="http://www.w3.org/2001/XMLSchema-instance"
xsi:schemaLocation="http://www.springframework.org/schema/beans
http://www.springframework.org/schema/beans/spring-beans-4.2.xsd
http://www.springframework.org/schema/context
http://www.springframework.org/schema/context/spring-context-4.2.xsd">
<context:property-placeholder location="classpath:person.properties" />

<!-- 注册组件 -->
<bean id="person" class="com.zsxfa.bean.Person">
    <property name="age" value="18"></property>
    <property name="name" value="liayun"></property>
    <property name="nickName" value="${person.nickName}"></property>
</bean>
</beans>
|
这样就可以将person.properties文件中的值注入到Person类的nickName字段上了。
然后,我们在IOCTest_PropertyValue类中创建一个test02()测试方法,如下所示。
1
2
3
4
5
6
| @Test
public void test02() {
ClassPathXmlApplicationContext applicationContext = new ClassPathXmlApplicationContext("classpath:beans.xml");
Person person = (Person) applicationContext.getBean("person");
System.out.println(person);
}
|
接着,运行以上test03()方法,输出的结果信息如下所示。

使用注解方式获取值
如果我们使用注解的方式,那么该如何做呢?首先,我们需要在MainConfigOfPropertyValues配置类上添加一个@PropertySource注解,如下所示。
1
2
3
4
5
6
7
8
| @PropertySource(value={"classpath:/person.properties"})
@Configuration
public class MainConfigOfPropertyValues {
@Bean
public Person person() {
return new Person();
}
}
|
这里使用的@PropertySource(value={"classpath:/person.properties"})注解就相当于XML配置文件中使用的<context:property-placeholder location="classpath:person.properties" />。
然后,我们就可以在Person类的nickName字段上使用@Value注解来获取person.properties文件中的值了,如下所示。
1
2
| @Value("${person.nickName}")
private String nickName;
|
配置完成后,我们再次运行IOCTest_PropertyValue类中的test01()方法来看下输出结果,如下所示。
1
2
3
4
5
6
7
8
9
10
11
12
13
14
15
16
17
18
19
20
21
| public class IOCTest_PropertyValue {
AnnotationConfigApplicationContext applicationContext = new AnnotationConfigApplicationContext(MainConfigOfPropertyValues.class);
@Test
public void test01() {
printBeans(applicationContext);
System.out.println("===================");
Person person = (Person) applicationContext.getBean("person");
System.out.println(person);
applicationContext.close();
}
private void printBeans(AnnotationConfigApplicationContext applicationContext) {
String[] definitionNames = applicationContext.getBeanDefinitionNames();
for (String name : definitionNames) {
System.out.println(name);
}
}
}
|

使用Environment获取值
使用@PropertySource注解读取外部配置文件中的key/value之后,是将其保存到运行的环境变量中了,所以我们也可以通过运行环境来获取外部配置文件中的值。
这里,我们可以稍微修改一下IOCTest_PropertyValue类中的test01()方法,即在其中添加一段使用Environment获取person.properties文件中的值的代码,如下所示。
1
2
3
4
5
6
7
8
9
10
11
12
13
14
| @Test
public void test01() {
printBeans(applicationContext);
System.out.println("===================");
Person person = (Person) applicationContext.getBean("person");
System.out.println(person);
ConfigurableEnvironment environment = applicationContext.getEnvironment();
String property = environment.getProperty("person.nickName");
System.out.println(property);
applicationContext.close();
}
|
运行以上test01()方法,可以看到输出的结果信息如下所示。


